Project Task - the Traffic Light
A traffic light is a light signal device, and it has an important role in controlling traffic. Traffic lights are usually installed at intersections.
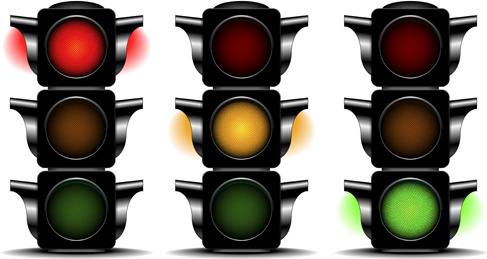
The first traffic light was installed on 10 December 1868 in London; it was designed by John Peake Knight. This traffic light was operated manually by a police officer. The first interconnected traffic lights were installed in Salt Lake City. The first automatic control traffic light was introduced in the United States of America, in Huston, in 1922, and in 1927 in England. The first traffic light in Serbia was installed in Belgrade, at the intersection of King Alexander Street, King Ferdinand Street (currently Kneza Miloša Street), and Takovska street, on 4 December 1939.
The color, shape and the size of light signals on a traffic light are determined by international standards: - stop – red
prepare to proceed – red and yellow at the same time
proceed – green
announces that the signal is about to change to red – yellow.
The colors turn on and off in a specific order, or more precisely, at certain time intervals.
Using a Micro:bit we will build a traffic light with red, yellow and green lights turning on and off at certain intervals, just like a real traffic light.
To make a traffic light, we will need:
1 Micro:bit
protoboard
styrodur
3 diodes (red, green and yellow)
3 resistors
4 crocodile clips
4 wires of different lengths.
Before we start connecting the Micro:bit to the diodes, we should remember that a Micro:bit has 25 pins, five big pins - 0, 1, 2, 3V and GND. The remaining 20 pins can be used for connecting the Micro:bit to other devices.

By using wires/crocodile clips, we will connect the Micro:bit via GND to any of the pins on the protoboard, so we can connect it to the GND diode.
The operation of the diode requires power; we will limit the power supply by using resistors (they provide some resistance that limits the flow of current and controls the voltage in the circuit).
The figure below shows the connection of the Micro:bit to one of the LEDs:
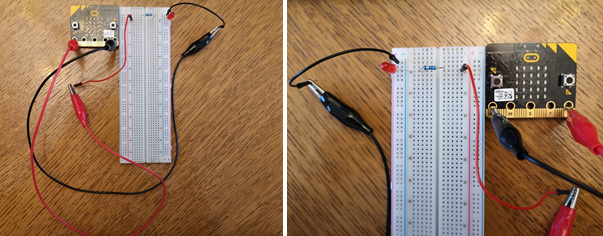
We connect the Micro:bit via pin P0 and one of the pins on the protoboard on the left side of the resistors (figure below). We will connect the longer part (+) of the light diode to the P0 pin using crocodile clips, and the shorter one, also using crocodile clips, to the GND pin (look at the picture below).
We will connect the other two LEDs the same way.
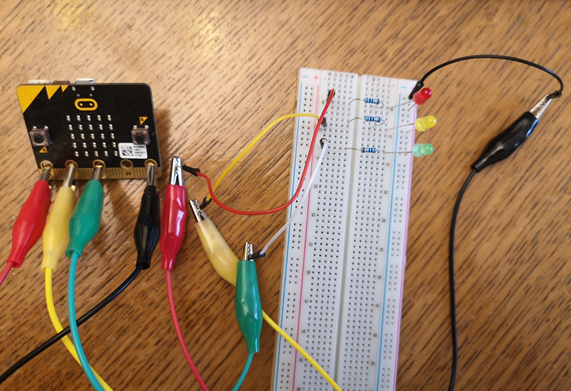
We will use this connection logic to physically make a traffic light out of styrodur.
Programming
We need to create a program, which allows the LEDs to turn on and off.
Step 1
Go to https://makecode.microbit.org/.
Step 2
Create a new project.
Now, we want to program the diodes to turn on and off.
Step 3
To create a code, which will allow the LEDs to turn on and off, we need to drag the block  from the category
 Advanced - Pins into the block  from the category
  .
.
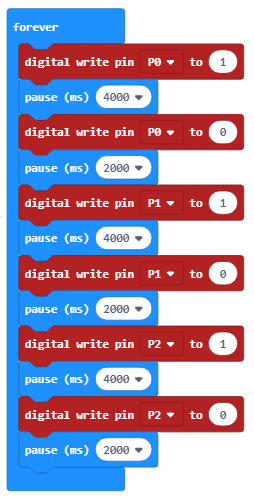
In order for the light to turn on, we need to put the number 1 into the space  . If the value has been set to 0, the light will turn off.
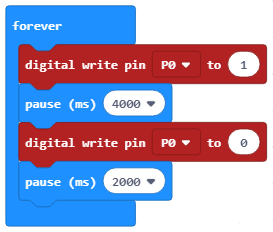
With regard to the light turning on and off, we also need to set a time interval within which these changes will occur.
We will set that the light stays turned on for 4 seconds, an off for 2 seconds. To achieve this, we will use the block  from the
 Basic category. Into the field  we will put 4000ms (which is 4 seconds) for the light to stay on, and 2000 for the light to stay off.
The final look of the traffic light code:
Download the .hex file to your computer by clicking on the button 
 . The Micro:bit will be ready to start working once you have dragged the file onto it.
